Facetune Teeth Whitening on Android Overview
Facetune has revolutionized the way we edit and enhance photos, offering a powerful suite of tools directly on your Android device. One of the most popular features is its teeth whitening capability, allowing users to achieve a brighter, more confident smile in seconds. This guide dives deep into the Facetune teeth whitening feature, offering essential tips and techniques to help you perfect your photos. Whether you’re a seasoned photo editor or a complete beginner, you’ll find valuable insights to elevate your mobile photo editing game. Get ready to discover how to harness the full potential of Facetune for stunning results!
Understanding Facetune’s Teeth Whitening Feature
Facetune’s teeth whitening feature is designed to provide a simple and effective way to brighten teeth in your photos. It’s a tool that’s incredibly user-friendly, making it accessible to everyone, regardless of their photo editing experience. The beauty of this feature lies in its intuitive design; with just a few taps, you can transform the appearance of your smile. The software intelligently identifies the teeth in your photo and allows you to make targeted adjustments to their color and brightness. Facetune offers an easy to use interface which can deliver professional results for enhancing your selfies and portraits, ensuring that your smile always looks its best.
How the Whitening Tool Works

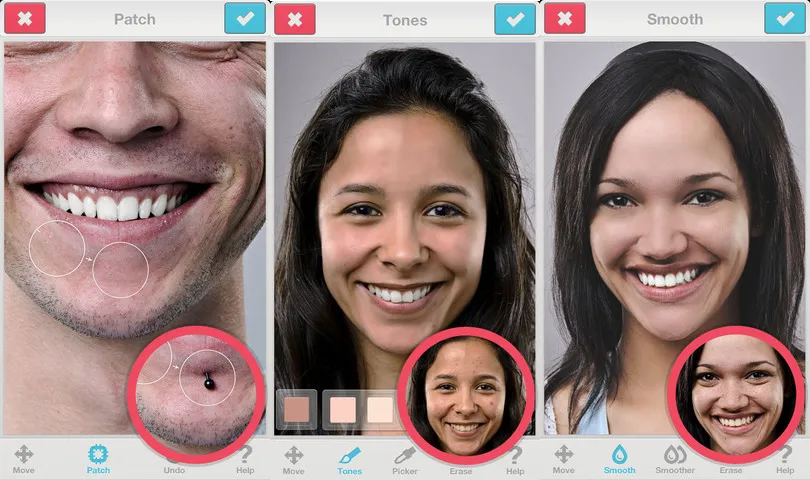
The teeth whitening tool in Facetune operates on a principle of localized color and brightness adjustments. When you select the tool, the app identifies the teeth in the image. You then use a brush to apply the whitening effect, and the software modifies the color and saturation of the selected areas. It intelligently applies the changes to avoid an unnatural look. This ensures that the teeth appear brighter without altering the overall aesthetic of the photo. The tool works by reducing yellowing and enhancing the natural whiteness of your teeth, delivering a clean and polished look. Furthermore, the tool often includes options to adjust the intensity of the effect, giving you complete control over the final result.
Key Features of Facetune Teeth Whitening
Facetune’s teeth whitening feature is packed with functionalities designed to make your editing experience smooth and effective. Beyond the basic whitening, it includes functionalities for precision control, allowing you to refine the adjustments. These include options to smooth out any unevenness, blend the effect seamlessly with the surrounding image, and even adjust the overall shade for a more natural appearance. This precision is crucial in achieving a realistic outcome, avoiding the common pitfalls of over-editing. Moreover, Facetune provides tools like the comparison feature, enabling you to view the before-and-after changes in real-time, ensuring that you’re satisfied with the edits before finalizing them.
Adjusting Color and Shade
The ability to adjust the color and shade of the teeth is paramount in achieving a natural-looking result. Facetune’s interface enables you to fine-tune the hue, saturation, and brightness of the teeth to match your desired aesthetic. You can subtly reduce yellowness, making your smile appear brighter and more appealing. The goal is to create a realistic effect that blends seamlessly with the rest of the photo, avoiding any stark contrast. Careful adjustment helps ensure that the whitening effect looks integrated into the image, maintaining the integrity of the photo’s original look. This control allows you to customize the whitening effect to your specific needs.
Smoothing and Blending

One of the keys to achieving a professional-looking result is to smooth and blend the whitening effect seamlessly. Facetune provides options to soften the edges of the whitening application, ensuring that the transition between the teeth and the surrounding areas is fluid and natural. The blending feature helps to prevent any hard lines or artificial looks. Careful attention to these details is essential to avoid an over-edited appearance. Facetune also allows you to adjust the intensity of the effect, preventing an unnatural brightness and maintaining the authenticity of the photo. By using the smoothing and blending tools effectively, you can achieve a refined and polished outcome.
Top 5 Tips for Perfect Facetune Teeth Whitening on Android
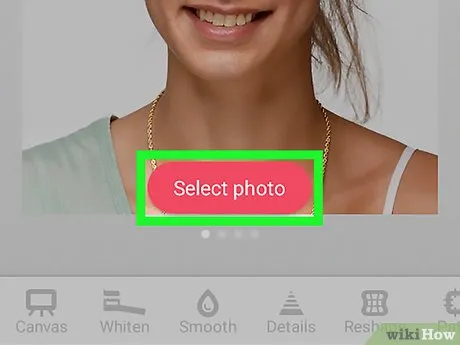
Achieving the perfect teeth whitening result on Facetune for Android involves more than just applying the whitening tool. Careful consideration of the photo and its settings is critical. Here are five essential tips to help you get the best results, ensuring that your smile always looks its best. These tips will guide you through the nuances of the app, empowering you to edit like a pro. Following these will enhance your photos and help to elevate your overall editing skills on Android.
Tip 1 Choose the Right Lighting
Lighting plays a crucial role in the appearance of your teeth in photos. Natural lighting, such as that found outdoors on a slightly overcast day, is ideal. This type of lighting provides even illumination, minimizing shadows and harsh highlights, and will prevent you from having to adjust the shade too much. Avoid shooting in direct sunlight, as it can create unwanted shadows that can make your teeth look darker than they are. Conversely, very dim lighting will require more aggressive editing, which can easily lead to an unnatural outcome. When taking the picture, position yourself so that the light source is in front of you or slightly above, this usually helps make your teeth look brighter in the picture.
Tip 2 Start with Small Adjustments
Always begin with subtle adjustments to the whitening effect. Overdoing it is a common mistake that can lead to an artificial appearance. Apply the whitening tool in small increments, checking the results after each adjustment. Facetune’s comparison feature is invaluable here, allowing you to see the before-and-after changes immediately. This approach helps you maintain control over the editing process and prevents you from over-whitening your teeth. Take your time and build up the effect gradually, rather than trying to achieve the desired brightness in one go. Remember, the goal is to enhance, not drastically alter the image.
Tip 3 Blend Carefully and Naturally
The key to a realistic outcome is to blend the whitening effect seamlessly with the rest of the image. Pay close attention to the edges of your teeth after applying the tool. Use the smoothing and blending tools to soften the transitions, making sure that the whitening effect integrates naturally with the surrounding areas. Avoid creating harsh lines or artificial-looking edges, as these will be immediately noticeable. Adjust the intensity and opacity of the whitening effect to ensure that it looks natural and not overpowering. A little blending goes a long way in ensuring that your final photo looks professionally edited, and the attention is kept to your smile.
Tip 4 Avoid Over-Whitening
One of the most important rules is to avoid over-whitening your teeth. It’s easy to get carried away with the tool, but the goal should always be to enhance your smile naturally, not to create an unrealistic appearance. Over-whitened teeth can look unnatural, drawing unwanted attention to the editing. Aim for a subtle, gradual improvement, rather than a dramatic transformation. Use the comparison tool to assess the changes, making sure that your teeth look brighter without appearing fake. It’s better to err on the side of caution and apply a lighter touch, ensuring a more believable result. Think of it as enhancing, rather than completely changing, your smile.
Tip 5 Use the Comparison Tool
Facetune’s comparison tool is your best friend when it comes to teeth whitening. This feature allows you to view the before-and-after results in real-time, making it easy to evaluate the changes. Regularly use the tool throughout the editing process to assess your progress. The comparison tool prevents you from making significant mistakes and helps to ensure that the final result looks natural and appealing. By continually comparing the edited photo with the original, you can make informed decisions about the level of whitening and blending needed. This provides an extra layer of control and will help you refine your results for every picture that you edit.
Troubleshooting Common Issues
Even with the best techniques, you might encounter a few common issues. Understanding these problems and how to fix them can significantly improve your editing results. Here are some of the most frequent issues and how to overcome them.
Uneven Whitening
Uneven whitening is a common issue that can make your smile look unnatural. This can happen when the whitening effect is applied inconsistently across the teeth. To fix this, carefully reapply the tool, focusing on the areas that appear less bright. Make sure to blend the edges thoroughly and adjust the intensity to ensure that all teeth have a uniform color. Using small, controlled brush strokes and paying close attention to the details is crucial in overcoming this. It is best to avoid applying the whitening tool in one quick sweep, and instead take a more deliberate approach.
Creating an Unnatural Look
The goal is to enhance your smile naturally, but creating an artificial look is a common mistake. This often results from over-whitening or applying the effect without proper blending. Always use the comparison tool to make sure that the changes look realistic. Avoid extreme adjustments and blend the edges of the teeth with the surrounding image to create a seamless transition. Remember that less is often more. A subtle enhancement will almost always look better than a dramatic, artificial change. Always strive for realism, ensuring that your edited photo looks as natural as possible.
Advanced Facetune Techniques for Android
Beyond the basic whitening tool, Facetune offers more advanced techniques that can refine your results and achieve professional-looking edits. By mastering these, you can take your mobile photo editing skills to the next level.
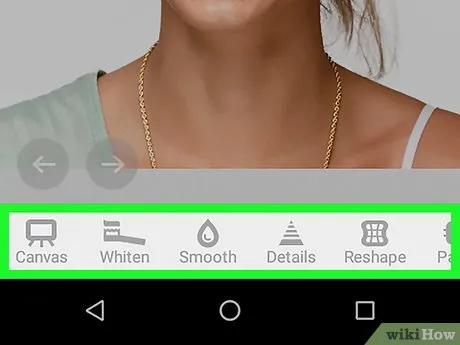
Using the Details Tool
The Details tool can enhance the textures of your teeth and add a touch of realism. This tool allows you to subtly sharpen the edges and textures, making your teeth appear more defined. It’s crucial to use this tool sparingly, as overusing it can lead to an unnatural appearance. Fine-tune the details by adjusting the intensity and focus, ensuring that the added texture blends seamlessly with the original image. The Details tool is a powerful option for creating a truly natural look and will provide a better level of detail. By using the details tool, you can elevate the quality of your edits.
Combining with Other Features

Facetune’s versatility shines when you combine the teeth whitening tool with other editing features. For example, you can use the smooth tool to eliminate blemishes on your skin, or the reshape tool to subtly adjust the shape of your smile. Using these features together, you can create a comprehensive edit that enhances your entire look. The key is to maintain balance and ensure that all edits work harmoniously together. Experimenting with different combinations of tools allows you to develop your unique editing style and achieve impressive results.
Conclusion
Facetune’s teeth whitening feature is an essential tool for anyone looking to enhance their smile in photos on Android. By understanding the core features, mastering the techniques, and following our top tips, you can achieve professional-quality edits with ease. Remember to start with small adjustments, use the comparison tool, and always aim for a natural look. With practice and patience, you can transform your photos and boost your confidence. So, go ahead and explore the power of Facetune, and start creating stunning, flawless smiles today! This is just the start, so keep practicing and experimenting to hone your skills.