Understanding Teeth Whitening in Photoshop Elements
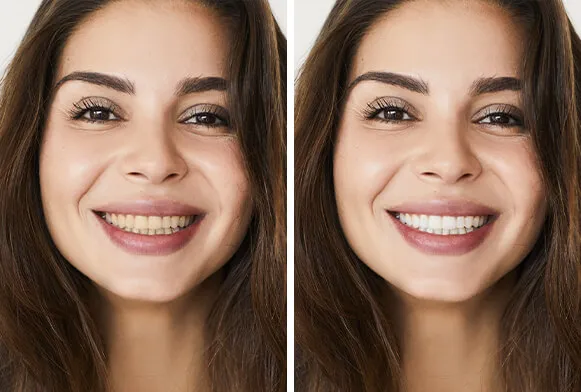
Teeth whitening in Photoshop Elements is a powerful way to enhance the appearance of your photos, giving your subjects a brighter, more confident smile. This guide will walk you through the essential steps and techniques to achieve professional-looking results, regardless of your experience level. Learn how to transform dull or discolored teeth into a dazzling, natural-looking white with ease. Whether you’re a beginner or have some experience with photo editing, this tutorial will provide you with the knowledge and skills needed to master teeth whitening in Photoshop Elements. Get ready to learn the techniques to create the perfect smiles!
Why Whiten Teeth in Photoshop Elements?
There are several compelling reasons to whiten teeth in Photoshop Elements. Photo editing allows for controlled and precise adjustments, enabling you to achieve the desired level of whiteness without the potential side effects of chemical treatments. This method offers a cost-effective alternative to professional whitening services. It’s also a versatile tool for enhancing various types of photographs, from portraits and family photos to product shots and social media content. Using Photoshop Elements gives you the freedom to experiment and perfect your technique, ensuring your subject’s smile always looks its best.
The Importance of a Bright Smile

A bright, white smile is often associated with youth, health, and confidence. In photographs, teeth whitening can significantly improve a person’s overall appearance, making them look more approachable and attractive. A brighter smile can also enhance the emotional impact of a photo, contributing to a more positive and engaging image. In a world where first impressions matter, a radiant smile can make a significant difference, whether it’s for personal portraits or professional headshots. In general, a great smile adds value to any photo!
Photoshop Elements vs Other Methods
While Photoshop Elements provides excellent teeth whitening capabilities, it’s important to consider other options. Professional teeth whitening services offer potentially faster and more dramatic results but come with higher costs. Over-the-counter whitening products are available, but the results may vary and can be less effective. Photoshop Elements gives you control over the whitening process, allowing for customized adjustments to fit each photo’s needs. You can fine-tune the level of whiteness and ensure a natural look, without the risks associated with more invasive methods. Photoshop Elements is therefore an advantageous alternative for many photographers.
Tools Needed for Teeth Whitening
To whiten teeth in Photoshop Elements, you’ll primarily need to use a combination of selection and adjustment tools. These tools will help you isolate the teeth and make precise modifications. Familiarize yourself with the interface to streamline your workflow. This section will explore the tools that are crucial to this process, setting you up for successful teeth whitening. The selection tools will allow you to isolate the teeth, and the adjustment tools will help you modify color and brightness for a perfect finish. Understanding the capabilities of each tool will enable you to achieve professional-level results in a user-friendly environment.
Accessing and Understanding Tools

Photoshop Elements’ interface provides easy access to the tools you’ll need. The main tools are usually located on the left side, and you can select tools like the Lasso or the Quick Selection Tool to select the teeth. Adjustment tools are found in the right panel or through the ‘Enhance’ menu. Explore each tool’s options to understand their capabilities. Practice using the tools on different photos to develop familiarity and confidence. This exploration will become second nature as you familiarize yourself with the different capabilities and how to leverage them to improve your images.
Using the Selection Tool
The selection tool is essential for isolating the teeth from the rest of the image. The Quick Selection Tool and the Lasso tools are both helpful. The Quick Selection Tool works best when there’s a clear contrast between the teeth and the surrounding area. The Lasso tools offer more manual control, allowing you to trace around the teeth precisely. After making a selection, you can refine it by adjusting the edges or using the ‘Select and Mask’ feature. Mastering selection tools is a core skill in photo editing, enabling you to make targeted changes with accuracy.
Adjusting Brightness and Contrast
Once you’ve selected the teeth, you can adjust their brightness and contrast using adjustment layers. Go to the ‘Enhance’ menu and select ‘Brightness/Contrast’. Adjust the sliders to gradually increase brightness and enhance contrast. Be careful not to overdo it; the goal is a natural white. Using adjustment layers allows you to make non-destructive edits. You can always go back and fine-tune the settings. Experiment with these adjustments to find the perfect balance between brightness and contrast, ensuring the teeth look naturally white and appealing.
Color Correction Tools

Color correction tools, such as the ‘Hue/Saturation’ adjustment, are crucial for removing yellow or other unwanted tones. Access these tools via the ‘Enhance’ menu. Reduce the yellow saturation until the teeth look whiter. You can also adjust the hue if necessary to correct any remaining color casts. Using these tools allows you to refine the color of the teeth, remove discolorations, and achieve a more natural and appealing white. Precise color correction is key to achieving professional-looking teeth whitening results, and the tools available in Photoshop Elements will allow you to do just that!
Step-by-Step Teeth Whitening Guide
This step-by-step guide provides a clear, concise approach to teeth whitening in Photoshop Elements. By following these steps, you can achieve beautiful, natural-looking results. Each step is designed to guide you through the process. The goal is to provide you with the ability to easily whiten teeth. Remember that practice and patience are key. Soon, you’ll be creating amazing smiles and transforming ordinary photos into extraordinary ones!
Opening and Preparing Your Image
Open the photo in Photoshop Elements. Start by duplicating the background layer to preserve the original image. This is done by going to the ‘Layer’ menu. Select the background layer, then go to Layer > Duplicate Layer. This will protect your original image while allowing you to make edits. Zoom in on the mouth area to make it easier to work with. Make sure the image is well-lit to ensure proper results. Proper preparation is crucial for a smooth and successful teeth whitening process.
Making a Selection Around the Teeth

Use the Quick Selection Tool or Lasso tools to carefully select the teeth. Take your time to trace around each tooth, ensuring the selection is accurate. If you make a mistake, use the ‘Subtract’ or ‘Add to Selection’ options to refine the selection. Pay close attention to the edges of the teeth to ensure a natural look. Once the selection is complete, you can proceed with the adjustments. Precise selection is crucial to isolate the teeth and apply targeted whitening, allowing you to achieve a natural-looking result.
Applying Brightness and Contrast Adjustments
With the teeth selected, go to the ‘Enhance’ menu and select ‘Brightness/Contrast’. Adjust the brightness slider to increase the whiteness. Also, slightly increase the contrast to make the teeth more defined. Make small adjustments and preview the results. Be careful not to overdo it; the goal is to enhance, not to create an unnatural appearance. These subtle adjustments will often make a significant difference. Once you’ve applied the brightness and contrast adjustments, you can move on to the next step, which is color correction and refinement.
Using the Adjustment Layers
Use adjustment layers to non-destructively adjust brightness and contrast. This means you can make changes and revert them at any time without affecting the original image. After making adjustments to brightness and contrast, consider adding a hue/saturation adjustment layer. By using adjustment layers, you can easily edit your adjustments and adjust them as needed. This method also allows you to experiment with different settings without causing damage to the original picture. Using adjustment layers will make your workflow much smoother.
Color Correction and Refinement

Use the ‘Hue/Saturation’ adjustment to refine the color. Decrease the yellow saturation to eliminate yellow tones. You may also slightly adjust the hue if needed. Minor refinements here can greatly impact the final result. If necessary, use the ‘Color Balance’ tool to correct any remaining color casts. Make the adjustments subtle for natural results. These small tweaks often make the biggest difference and help achieve a more natural appearance. Refinement is critical to creating realistic results and avoiding an unnatural, overly white appearance.
Final Touches and Refining the Result
After color correction, zoom in and check for any imperfections. Use the ‘Eraser’ tool to gently remove any unwanted whitening from the gums or surrounding areas. Soften the edges of the selection using the ‘Feather’ option to ensure a seamless transition. Add a slight blur if necessary to blend the colors and eliminate hard edges. It’s about refinement. These subtle enhancements are what separate a great edit from a mediocre one. Ensure the whitening looks natural and enhances the subject’s smile, rather than distracting from it.
Common Mistakes to Avoid
Avoiding common mistakes is crucial for achieving the best results. By knowing what to avoid, you can create more realistic and appealing images. Overdoing any of the adjustments can lead to artificial-looking outcomes. Being aware of these pitfalls can prevent you from ruining your photos and will significantly improve the quality of your edits. Here are some common mistakes to avoid.
Over-Whitening and Unnatural Results

The most common mistake is over-whitening the teeth. Over-whitening looks unnatural and detracts from the image’s overall appeal. A subtle touch is always better. When adjusting brightness and contrast, make small changes. Also, carefully observe your photo at different zoom levels. Always aim for a natural look. Avoid the temptation to push the adjustments too far. The goal is to create a brighter, healthier smile, not a distracting, artificial one. The more realistic the final image, the better.
Ignoring the Rest of the Face
Another common mistake is not considering the overall appearance of the face. Make sure that the teeth color matches the rest of the face. Pay attention to the skin tone and other details in the image. Adjust the skin tone or add some color correction to make the skin and teeth match. Consider adding a bit of warmth to the teeth if the skin tone is warm. By considering the balance of the image, you can ensure that the teeth whitening complements the overall look. The goal is a cohesive final product.
Saving and Exporting Your Edited Image
Saving and exporting your edited image correctly is essential for preserving its quality and sharing it effectively. This section covers the crucial aspects of file format selection and optimization. Ensure your edited photos look their best when displayed on the web, printed, or shared with others. Mastering this step will allow you to showcase your photo editing skills to the fullest extent.
Choosing the Right File Format
When saving your image, choose the appropriate file format. For most web use, JPEG is a good option because it offers a good balance of quality and file size. For print, consider saving your image as a TIFF to retain the most detail and prevent compression. In Photoshop Elements, use the ‘Save As’ option and select your desired format. Choose a format appropriate for the intended use of the image. Choosing the correct format will improve your results. These options will ensure your work looks as polished and professional as possible.
Optimizing for Web or Print
When saving for the web, optimize the image to reduce the file size without sacrificing quality. Reduce the resolution. When saving for print, ensure the resolution is sufficient for the intended print size. In Photoshop Elements, you can adjust the image size and resolution. Consider using the ‘Save for Web’ option. When optimizing for the web, aim for a balance between image quality and file size to ensure fast loading times. For print, ensure sufficient resolution to achieve the desired print quality. Proper optimization will allow you to showcase your work efficiently.