Understanding Teeth Whitening in Photoshop Elements
In the realm of digital photography and photo editing, the ability to enhance and refine images is a valuable skill. One of the most sought-after techniques is teeth whitening. This process involves adjusting the color and brightness of teeth in a photograph to create a brighter, more aesthetically pleasing smile. Photoshop Elements, a streamlined version of Adobe Photoshop, provides a user-friendly environment for achieving professional-quality results. Understanding the principles behind teeth whitening and the tools available in Photoshop Elements empowers you to transform your portraits and enhance the overall visual appeal of your images.
Why Whiten Teeth in Photoshop Elements
There are several reasons why you might want to whiten teeth in Photoshop Elements. Stained or discolored teeth can detract from an otherwise perfect photograph, drawing attention away from the subject’s face. Whitening teeth can significantly improve the overall aesthetic of a portrait, making the subject appear more attractive and confident. Moreover, teeth whitening is a common practice in professional photography, used to ensure that the final image meets industry standards and client expectations. Whether you’re editing personal photos or working on professional projects, mastering this technique can elevate your photo editing skills.
The Importance of Photo Editing

Photo editing plays a crucial role in contemporary visual communication. It allows photographers and editors to correct imperfections, enhance features, and create a polished final product. Photo editing techniques like teeth whitening are essential for portrait photography, where a natural and flattering appearance is often desired. By using software like Photoshop Elements, you can subtly adjust the color and tone of teeth, ensuring that the final image reflects your creative vision. From retouching blemishes to adjusting colors, photo editing tools empower you to transform raw images into stunning visual narratives. The ability to manipulate images effectively is a fundamental skill in the digital age.
Photoshop Elements Overview
Photoshop Elements is a simplified version of Adobe Photoshop, designed for ease of use while still providing powerful editing capabilities. Its intuitive interface, accessible tools, and guided edits make it an ideal choice for beginners and intermediate users. Photoshop Elements offers a comprehensive suite of features, including image adjustment, retouching, and special effects. The software supports various image formats and allows you to organize and share your photos easily. With its focus on user-friendliness and versatility, Photoshop Elements empowers you to create stunning images without the complexity of the full Photoshop suite. The interface is designed to be easy to navigate, with tools and panels that provide quick access to editing functions. (Image: photoshop-elements-interface.webp)
Essential Tools for Whitening Teeth
To effectively whiten teeth in Photoshop Elements, you’ll need to familiarize yourself with a few essential tools. These tools provide the precision and control necessary to achieve natural-looking results. Understanding how to use these tools will significantly improve your ability to whiten teeth and enhance the overall quality of your photos. The Selection Tool, Lasso Tool, Brush Tool, and Adjustments Panel are the key components for successful teeth whitening.
The Selection Tool

The Selection Tool is fundamental for isolating the teeth in your image. This allows you to make precise adjustments without affecting the surrounding areas. There are several selection tools available in Photoshop Elements, including the Quick Selection Tool, the Magic Wand Tool, and the Rectangular Marquee Tool. The Quick Selection Tool is often the most efficient for selecting teeth, as it intelligently detects edges and allows you to quickly refine your selection. The selection tool is used to create a boundary around the teeth, defining the area where changes will be made. (Image: teeth-selection-tool.webp)
The Lasso Tool
The Lasso Tool offers a more manual approach to making selections. With the Lasso Tool, you can freehand draw a selection around the teeth. This tool gives you more control, especially when dealing with complex shapes. The Magnetic Lasso Tool is particularly helpful, as it automatically snaps to the edges of the teeth as you move your cursor. The Lasso Tool is ideal for fine-tuning selections and making precise adjustments in areas where the Quick Selection Tool might struggle. (Image: teeth-lasso-tool.webp)
The Brush Tool
The Brush Tool allows you to make targeted adjustments directly on the selected area. By adjusting the size, hardness, and opacity of the brush, you can control the intensity of the whitening effect. The Brush Tool is useful for applying subtle color corrections and fine-tuning the overall look of the teeth. It is important to use a soft-edged brush to avoid harsh lines and ensure a natural appearance. With the Brush Tool, you can create a smooth and even whitening effect. (Image: brush-tool-teeth.webp)
The Adjustments Panel

The Adjustments Panel is where you’ll make the actual adjustments to whiten the teeth. It contains various options, including brightness, contrast, hue, and saturation. The most commonly used adjustments for teeth whitening are Brightness/Contrast and Hue/Saturation. The Adjustments Panel allows you to apply these changes non-destructively, which means you can always revert to the original image if needed. Experimenting with these settings is key to achieving the desired results. (Image: adjustments-panel-teeth.webp)
Step-by-Step Guide to Whitening Teeth
Here’s a step-by-step guide to whiten teeth in Photoshop Elements. This process is designed to be straightforward and effective, guiding you through each stage from image preparation to final refinements. Each step is crucial for achieving a natural and aesthetically pleasing result. By following these instructions carefully, you’ll be able to master the art of teeth whitening and enhance your photo editing skills.
Opening and Preparing Your Image
Begin by opening the image in Photoshop Elements. Select the image file from your computer or drag and drop it into the application. Once the image is open, create a duplicate layer. This is essential as it allows you to make non-destructive edits. To duplicate the layer, right-click on the background layer in the Layers panel and select ‘Duplicate Layer’. This ensures that you can always revert to the original image if you make any mistakes during the editing process.
Selecting the Teeth

Use the Selection Tool (Quick Selection Tool or Lasso Tool) to carefully select the teeth. The goal is to isolate the teeth from the surrounding gums and other areas. Start by roughly selecting the teeth and then refine your selection using the ‘Add to selection’ and ‘Subtract from selection’ options. Make sure your selection is precise, paying close attention to the edges of the teeth. A well-defined selection is crucial for preventing the whitening effect from bleeding into the gums or other areas of the image.
Making Adjustments
Go to the Adjustments panel and select Brightness/Contrast or Hue/Saturation. Start by slightly increasing the brightness. Adjust the contrast to enhance the effect, but be careful not to overdo it, as this can lead to an unnatural look. Use the Hue/Saturation adjustments to fine-tune the color of the teeth. Reduce the yellow tones by adjusting the hue and saturation. Make subtle adjustments to achieve a natural appearance.
Using the Brush Tool for Precision
After making your initial adjustments, use the Brush Tool to refine the whitening effect. Select a soft-edged brush and, with a low opacity, gently brush over the teeth to apply the adjustments. The Brush Tool allows you to control the intensity of the whitening in specific areas, which is particularly useful for addressing uneven staining or discoloration. This ensures that the whitening appears natural and blends seamlessly with the rest of the image. By carefully applying the brush, you can create a subtle and realistic effect.
Adjusting Brightness and Contrast

Adjusting the brightness and contrast can significantly enhance the whitening effect. Increasing the brightness will make the teeth appear lighter, while adjusting the contrast will add definition. When making these adjustments, it is important to maintain a balance. Overdoing the brightness or contrast can make the teeth look artificial. Experiment with small increments, constantly checking the overall look of the image. Fine-tuning these settings is essential for achieving a natural and appealing result.
Color Correction Techniques
Color correction plays a vital role in ensuring a natural appearance. Use the Hue/Saturation adjustments to fine-tune the color of the teeth. Reduce the yellow tones to achieve a whiter look. You may also slightly adjust the hue to remove any unwanted colors. Color correction allows you to correct any tints or discoloration, ensuring that the teeth blend well with the overall image. Make subtle adjustments until the color looks natural and appealing.
Fine-Tuning Your Edits
Once you’ve made your adjustments, take the time to fine-tune your edits. Zoom in on the teeth and carefully examine the edges. Use the Brush Tool with a very low opacity and a soft edge to blend any harsh lines. Ensure that the whitening effect looks natural and seamlessly blends with the surrounding areas. Fine-tuning ensures that the final result is polished and professional.
Adding a Subtle Touch

The key to successful teeth whitening is subtlety. Avoid over-whitening the teeth, as this can make them look artificial and unrealistic. Instead, aim for a natural appearance. Make small, incremental adjustments and regularly check the overall look of the image. Subtlety is key to achieving the best results. The goal is to enhance the natural appearance of the teeth, not to make them appear completely unnatural.
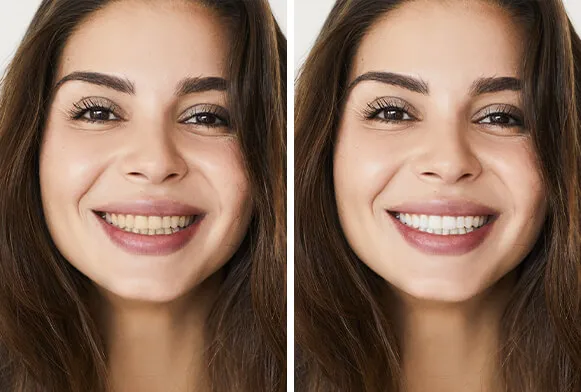
Checking for Natural Look
After each step, always check to ensure that the teeth look natural. Zoom in and examine the details, paying close attention to the edges of the teeth and how they interact with the gums. Step back and look at the overall image to assess the effect. If the teeth look too white or artificial, reduce the intensity of the adjustments. Always compare the edited image to the original to make sure you’re achieving a natural and pleasing result. (Image: teeth-whitening-before-after.webp)
Advanced Techniques for Enhanced Results
Once you are comfortable with the basic techniques, consider these advanced methods for even better results. These methods can help you achieve a more professional finish by addressing specific issues and refining your techniques. Advanced techniques can further enhance the natural look of the teeth and improve the overall quality of the image.
Addressing Uneven Staining
If the teeth have uneven staining, use the Brush Tool to target specific areas. Create a separate selection for each tooth or section of teeth. Then, apply adjustments to each area individually to correct the color and brightness. Adjust the brush size to suit the specific area and use a low opacity to gradually build the effect. This helps ensure that the final result looks natural and the staining is removed without over-whitening. Be careful with areas with fillings or other dental work. (Image: uneven-staining-teeth.webp)
Dealing with Shadows and Highlights
Shadows and highlights can affect the appearance of the teeth. Use the Dodge and Burn tools, or the Brush Tool with a very low opacity, to adjust the shadows and highlights. Dodging lightens the areas, while burning darkens them. This can help maintain a natural look and add depth to the teeth. Carefully manage the shadows and highlights to avoid creating an artificial appearance.
Smoothing and Blending
Blending the edges of the teeth is crucial for a natural look. Use the Brush Tool with a soft edge and a low opacity to gently blend the areas where the teeth meet the gums. You can also use the Blur Tool or the Gaussian Blur filter to slightly soften the edges. This will create a seamless transition and ensure that the teeth look natural in the image.
Common Mistakes to Avoid
Even experienced photo editors can make mistakes. Avoiding these common errors will improve your results and help you achieve a more professional finish. By learning about these mistakes, you can refine your workflow and achieve a more natural and effective result.
Over-Whitening
One of the most common mistakes is over-whitening the teeth. Teeth that are too white look artificial and unnatural, drawing unwanted attention. Always err on the side of subtlety and make small adjustments. Check the results against the original image, and if the teeth look overly bright, reduce the intensity of the changes. The goal is to enhance the natural appearance of the teeth, not to create an unnatural effect.
Ignoring Natural Tooth Variation
Teeth are not uniform in color; they have natural variations, including shadows and highlights. Ignoring these variations and applying a uniform whitening effect can make the teeth look flat and artificial. When editing, pay attention to the natural color variations and use the Brush Tool to apply adjustments more selectively. Preserve some of the natural shadows and highlights to maintain realism.
Not Saving Your Work
Always save your work frequently and create backup copies. Photoshop Elements can crash or experience other issues, and you don’t want to lose your progress. Save your files in a format that preserves the layers so you can go back and make further edits if needed. Always save your work in the native PSD format while working, then export a JPEG for sharing.
Conclusion
Whitening teeth in Photoshop Elements is a valuable skill that can significantly enhance the appearance of your photos. By understanding the tools and techniques described in this guide, you can transform your portraits, improving the overall aesthetic of your images. Remember to practice and experiment with different techniques to find the methods that work best for you. With patience and attention to detail, you can achieve natural-looking teeth whitening and elevate your photo editing skills to new heights. Continue to practice, experiment and refine your techniques, and you will achieve great results.